SoundBoxes Helsinki Info + Video
The MUU Gallery requested info-sheets for each of the instruments I am showing there. A whole weekend of vector-scribbling later, I present these examples of my mad Inkscape skillz as testament to the fact that I probably should get more sunlight this summer…
Download the PDF catalog with photos here:
derek_holzer-soundboxes_catalog_2012.pdf
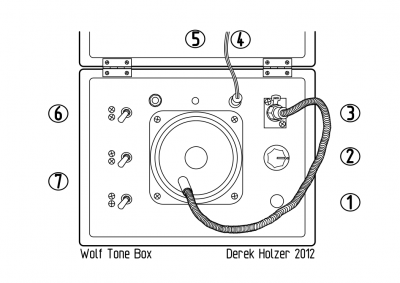
Wolf Tone Box
Derek Holzer
2012
This box was created from a found children’s karaoke toy specially for the MUU Invisible Time exhibition, Helsinki (FI). It features a voice-changing circuit, condenser microphone and loudspeaker mounted in an antique wooden box, and has been equipped with “bend points” where physical contact with the circuit changes the sound.
1) On/Off Switch
2) Volume Knob
3) Input Jack
4) 9V Power Input: for battery or wall adaptor
5) Speaker
6) Bend Points: touching two of the screws together with your finger can “bend” the sound of the instrument, or flip one of the switches to hold a certain sound
7) Condenser Microphone with Flexible Neck
To Play:
A) Press the On/Off Switch, you will see a small light above the Speaker when the box is activated
B) Speak into the Condenser Microphone
C) Adjust the Volume Knob to lower the level, raise it or create feedback
D) Feedback can be also created by lowering the Microphone nearer to the Speaker
E) Experiment with the Bend Points using either fingers on the screws or the switches
F) If the sound dies out, speak into the microphone again
This instrument is for sale, price EUR 260.
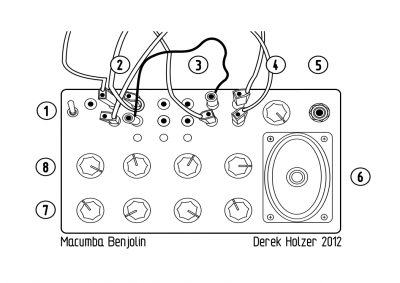
Macumba Benjolin
Derek Holzer
2012
The Benjolin is a circuit designed by Rob Hordijk from the Netherlands. It contains two oscillators (one slow and one fast), a band-pass filter and a circuit Hordijk calls the “Rungler”, which allows chaotic feedback possibilities between the different parts of the circuit. This one has been customized with an old silverware case, a built-in amp and speaker and a patchbay for further chaotic interactions.
1) On/off Switch
2) Inputs: the four left-hand-side jacks are inputs, don’t unplug these. The black connection with the red cable connects to the speaker. The other input jacks connect to different parts of the oscillators.
3) Outputs: the eight right-hand-side jacks are outputs, play with these. The black jack is the output of the filter. The others others are different parts of the oscillators.
4) Volume knob
5) Output jack, for plugging into other SoundBoxes
6) Speaker: this is turned off when something is plugged into the output jack
7) Filter Controls: these will only change the sound when using the black output jack
8) Oscillator Controls: these change the frequency and chaos levels of the oscillators
To Play:
A) Flip the On/Off switch upwards
B) Adjust the Volume Knob
C) Create feedback by plugging the blue cables from the left-hand side into the different output jacks on the right hand side
D) Listen to different parts of the synthesizer connecting the red cable from the black jack on the left-hand side to any of the output jacks on the right-hand side
E) Use the top row of knobs to adjust the two oscillators
F) Use the bottom row of knobs to adjust the filter, and remember you only hear the filter when the red cable is connected to the black output jack
9) The Macumba Benjolin requires two VERY FRESH 9V block batteries to operate properly
This instrument is from the personal collection of the artist. Customizations of many electronic music circuits are available on request.
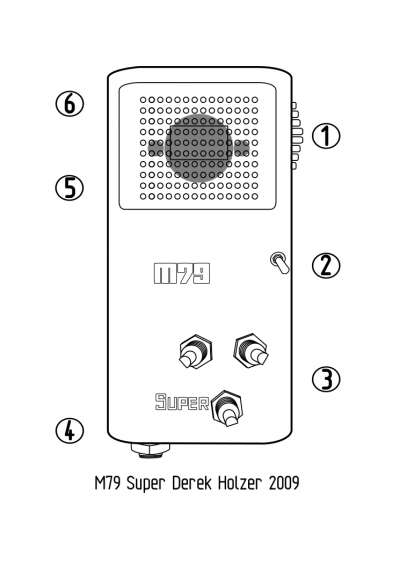
M79 Super
Derek Holzer
2009
The smallest synthesizer I have ever made, the M79 Super was built during the Piksel Neanderthal Electronics workshop in Bergen (NO). Here, three oscillators, a tiny speaker and two sound-reactive LEDs are placed inside a beautiful, old, palm-sized flashlight from the 1970’s.
1) On/Off Switch
2) Third Oscillator On/Off Switch
3) Oscillator Frequency Control Knobs
4) Output Jack: to connect the M79 Super to larger speakers
5) Very Small Loudspeaker
6) Two Audio-reactive LEDs: one of these displays the waveform of Oscillators 1+2, and the second displays the waveform of Oscillator 3
To Play:
A) Slide down the On/Off Switch located on the side of the object
B) Flip the Third Oscillator On/Off Switch up or down to activate/deactivate Oscillator 3, and notice what effect it has on the sound
C) Adjust the frequencies of the different Oscillators
D) You can make a filter by covering the small Loudspeaker with a cupped hand or your mouth
This instrument is for sale, price EUR 130.
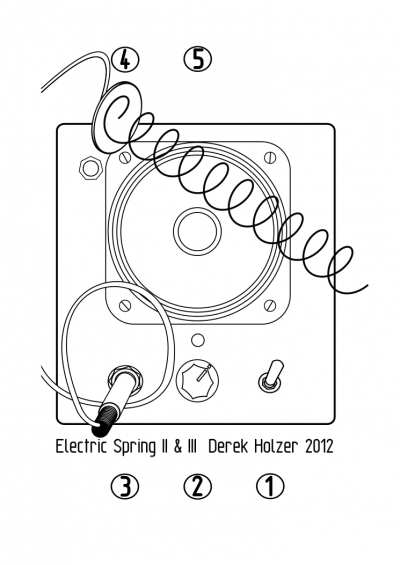
Electric Spring II and III
Derek Holzer
2012
These are simple, resonant drone boxes using the feedback between a simple contact microphone with a coil-spring and the speaker to make rich harmonic sounds or metallic reverb effects. These were created in an edition of three for the Electric Spring Festival in Huddersfield (UK).
1) On/Off Switch
2) Volume Knob
3) Input Jack: other kinds of microphones or instruments could also be connected here
4) Contact Microphone + Spring: this microphone picks up physical vibrations rather than sounds from the air. It has a resonant coil spring attached to it which makes the drone and also can be used as an “antenna” to search for new sounds
5) Speaker
To Play:
A) Turn Volume Knob all the way to the left
B) Place the Contact Microphone across the Speaker
C) Flip the On/Off switch upwards
D) Adjust the Volume Knob until you start to hear a tone
E) Adjust the position of the Contact Microphone + Spring and the Volume Knob to find new sounds
F) You may gently touch the Speaker with the Spring, but please do not press hard or you will damage the Speaker
These instrument are for sale, price EUR 80 each.
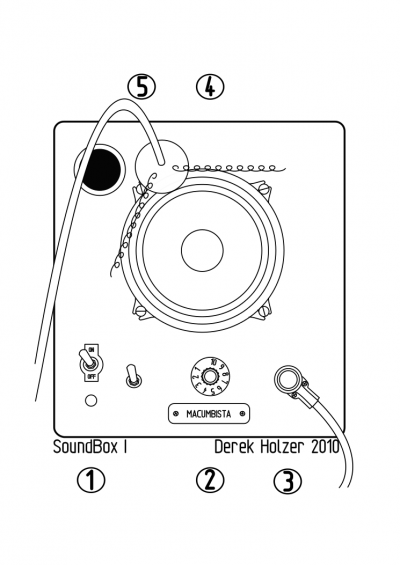
SoundBox I
Derek Holzer
2010
This was the first SoundBox instrument I created in 2010. It uses feedback and the physical vibration of the speaker cone to create different kinds of chaotic sounds.
1) On/Off Switch
2) Volume Knob
3) Input Jack: other kinds of microphones or instruments could also be connected here
4) Speaker
5) Contact Microphone: this microphone picks up physical vibrations rather than sounds from the air. It has two “antenna” attached to it to search for new sounds.
To Play:
A) Turn Volume Knob all the way to the left
B) Place the Contact Microphone across the Speaker
C) Flip the On/Off switch upwards
D) Adjust the Volume Knob until you start to hear a tone
E) Adjust the position of the Contact Microphone and the Volume Knob to find new sounds
F) Place some of the found objects provided in the speaker and see how the vibrations move them around and change the sound
This instrument is from the personal collection of the artist, and is used frequently in performance.
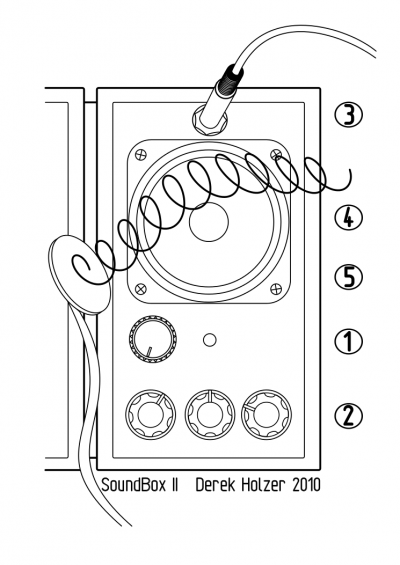
SoundBox II
Derek Holzer
2010
The second SoundBox I built, this one remains a bit incomplete–it looks better than it functions. Besides the normal SoundBox microphone/amplifier/speaker feedback loop, this one was intended to have a small synthesizer circuit which would alter the sound as it passed through. This part didn’t work out so well, but I left the controls to remind me that one day I should fix it!
1) On/Off Knob
2) Three Useless Controls
3) Input Jack: for Contact Microphone or other sound sources
4) Speaker
5) Contact Microphone + Spring: this microphone picks up physical vibrations rather than sounds from the air. It has a resonant coil spring attached to it which makes the drone and also can be used as an “antenna” to search for new sounds
To Play:
A) Turn the On/Off Knob clockwise, you will feel a click when the box turns on, but please don’t expect it to control the volume as well!
B) Don’t bother with the Three Useless Controls either, they’re only decorations at this point
C) Adjust the position of the Contact Microphone + Spring to find new sounds
D) You may gently touch the Speaker with the Spring, but please do not press hard or you will damage the Speaker
This instrument is from the personal collection of the artist, and is a work-in-progress.
Derek Holzer: live SoundBox Performance at MUU Gallery, Helsinki 07 June 2012. Video by Rita Leppiniemi.
Tags: finland, neanderthal electronics, performance, photo, soundboxes, video